


IJ Start Canon is the most famous printer brand that comes under the top 10% of companies in India. Canon is a Japanese Multinational Company (MNC) established in 1956 with its headquarters in Tokyo, Japan. Canon has already captured a very good size of the electronics market with its different products such as Lenses, Cameras, medical equipment, scanners, printers, and various other devices.
Their main products from which the company is getting the major part of sales are printers and cameras. Their products are available on online and offline modes across the complete globe. Every citizen in the world has almost tried canon products whether for taking printouts or using high-quality cameras or medical types of equipment. But in this article, we will cover all the important topics that you must know about the HTTP //ij.start.canon printers.
How to Set Up IJ Start Canon |🖨Canon.com/ijsetup Steps🖨
Below Canon.com/ijsetup, we have mentioned the steps which you can easily follow to set up your Canon.com/ijsetup printer. Before starting the setup, do check that your WIFI is working properly and is connected to the printer.
- First, with proper handle and care, take out the printer and its components like cartridges, cables, etc. from the box.
- Remove all the packaging wraps, tapes, and protective plastic from the screen of the printer.
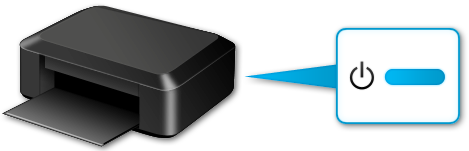
- Now, connect the printer with the power socket and turn it on. Once, the printer will be turned on, the display of the printer screen will start.
- Then remove the cartridge outlet seal and the plastic covers covering the cartridge area.
- Afterward, open the top cover of the printer, and then the printhead carriage will adjust automatically to its place. Then, put all the cartridges in their designated slots.
- Put the top cover of the printer back to its position and after that, the printer will start making a noise. This noise indicates that you have successfully put the cartridges.
- Now, with precautions open the flap from the back of the printer and pull out the paper tray and put some pages in that.
- Then put some paper in the feeder and push the paper to try to fit it back.
Now, your http://canon.com/ijsetup setup. If you have any trouble regarding the setup installation, then you can visit the official IJ Start Canon setup page of canon Printers i.e., canon.com/ijsetup to get the solution. On this page, you will get all the setup solutions for each device.
How to Connect 🖨 IJ Start Canon Printer 🖨with the WIFI
After you have set up your ij.canon.start Canon Printer, now, it’s time to connect your printer with the WIFI. Before you start the process, do check that your wireless router is available and is working properly. After that, connect your PC with that WIFI network.
- Once, you have connected your PC with the WIFI, follow these below-mentioned steps which you can follow to connect your IJ Start Canon printer with the WIFI.
- Turn on your printer by connecting the main wire with the socket. Once your printer will be turned on, the display screen will show the Canon official logo.
- Once the logo will go out, you will see different options on the screen. There, search for the WIFI icon on the bottom left of the screen and tap on it.
- On the bottom of the display screen, click on LAN settings.
- Then three options will pop out and from there search and select the “Wireless LAN” option.
- Click on the Wireless LAN Setup and go to the Manual Connect option.
- Then, you will see all the available WIFI networks in that location.
- From that list, select your WIFI option by tapping on it.
- Now, it will ask you to enter the WIFI password. Tap on the input area to type the WIFI network password. Especially take care of the shift and the enter button, as these buttons can sometimes change the value.
- Once you finished typing the password, tap on OK.
- Then, it will ask for confirmation to connect to the WIFI network. So again, tap on OK, to complete the connection.
- For connecting to the WIFI will initially take a few seconds, later on, the screen will display a pop-up notification showing “Connected to the Wireless Router”.
The environment necessary for the wireless connection
Before connecting this printer to the network, confirm the following two items, (A) and (B).
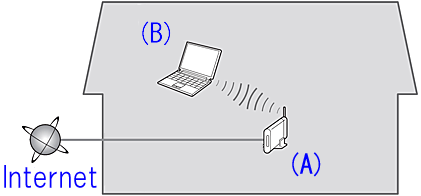
(A) Wireless router (supporting IEEE802.11b/g/n)
Your wireless router is the device that connects the network devices in your home (computer, printer, and so on) to the Internet and allows communication between those devices on your home network. A wireless router is necessary for the procedure described here. To use your printer over a wireless connection, your wireless router must already be set up.
(B) The computer to be used with the printer must be connected to the network.
In order to confirm whether the computer to be used with the printer is connected to the network, try to browse the Internet website from the computer.
CAUTION
– Cautions regarding wireless LAN setup
- For information regarding your wireless router’s setup method and functionality, refer to its instruction manual or contact its manufacturer.
- Regarding the setup method of the computer, refer to the instruction manual for the computer you are using, or contact its manufacturer.
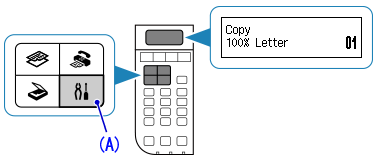
1. Prepare for the “Cableless setup”
Before Start IJ Start Canon Wireless Connection Set-up
Make sure that the printer is proper on.
1. Press the [ Set-up ] button (A) on the printer.
2. Use the  or
or  button (B) to select [ Wireless LAN setup ].
Press the [ OK ] button.
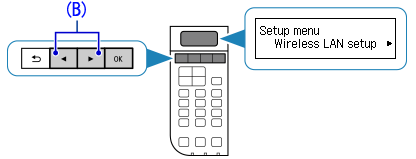
3. Select [ Other setup ].
Press the [ OK ] button.

4. Select [ Cable less setup ].
Press the [ OK ] button.
![]()
Now, the printer is ready for wireless LAN connection in the “Cable less setup” method.
The connection between the printer and the wireless router is not yet complete. To complete the connection, a software install is necessary.
Install the software.
2. Install the Software (Windows)
IMPORTANT
- Quit all applications before installation.
- Log on using an administrator account.
REFERENCE
If the computer is equipped with a CD-ROM drive, you can use CD-ROM for installation.
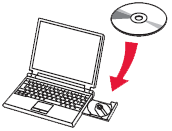
- Click [ Run Msetup4.exe ] on the AutoPlay screen, then click [ Yes ] or [ Continue ] on the User Account Control dialog box.
If the CD-ROM does not autorun:
Double-click [ (My) Computer ] > CDROM icon > [ MSETUP4.EXE. ]
Go to Step 5 and follow the instructions.
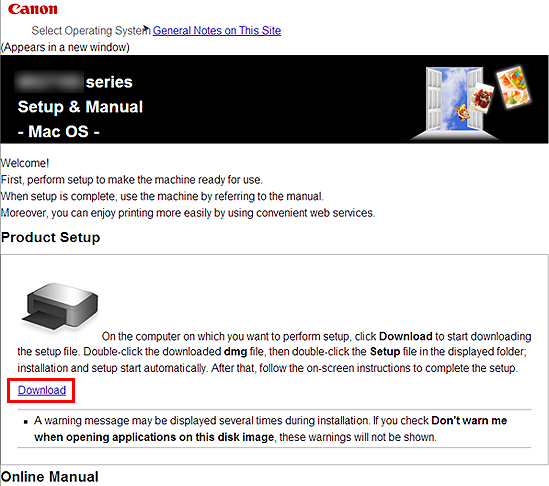
1. Visit http://canon.com/ijsetup/.
2. Select your region, printer name, and computer OS.
3. In the Product Setup section, click Download. The setup file will be downloaded.
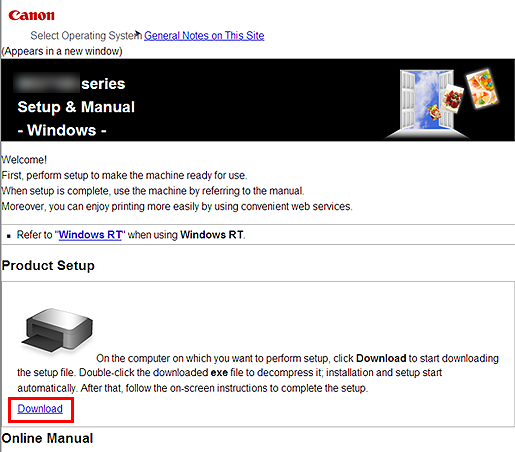
4. Double-click the downloaded .exe file.
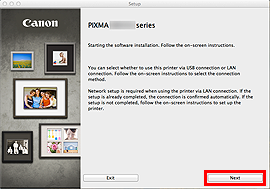
The setup will start automatically. Follow the on-screen instructions to complete installation.
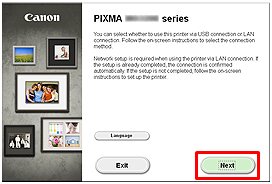
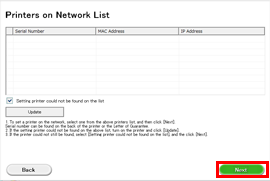
5. Click [ Next ].
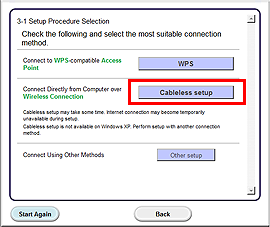
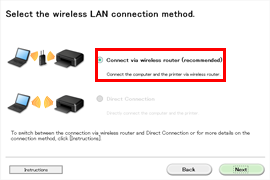
6. Click [ Wireless LAN Connection ].
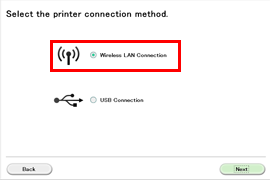
7. Click [ Connect via wireless router (recommended) ].

8. Click [ Next ].
9. Click [ Cableless setup ].
REFERENCE
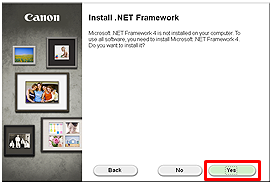
When the .NET Framework screen appears, click [Yes].
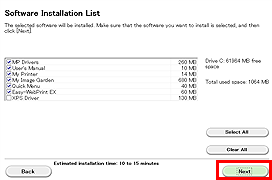
10. Click [ Next ].
REFERENCE
- Easy-WebPrint EX
Easy-WebPrint EX is Web print software that is installed on the computer when installing the supplied software. Internet Explorer 7 or later (Windows) is required to use this software. An Internet connection is required for installation.
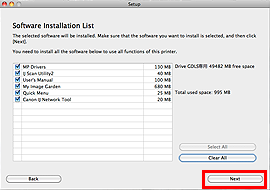
Follow any on-screen instructions to proceed with the software installation.
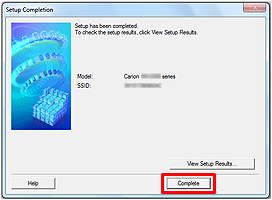
11. When the Setup Completion dialog box appears, click [ Complete ].
12. Click [ Next ].

– Important Information for the installation
- If the Extended Survey Program screen appears
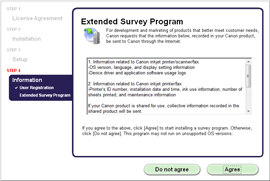
If you can agree to Extended Survey Program, click [ Agree ].
If you click [ Do not agree ], the Extended Survey Program will not be installed.
(This has no effect on the machine’s functionality.)
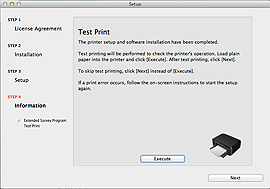
- When the Test Print window is displayed
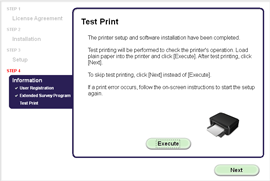
Test printing will be performed to check the printer’s operation.
Load plain paper into the printer and click [ Execute ].
After test printing, click [ Next ].
To skip test printing, click [ Next ] instead of [ Execute ].
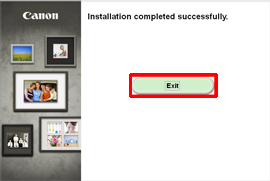
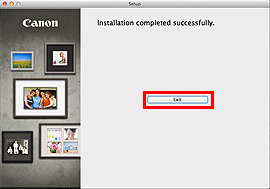
13. Click [ Exit ] to complete the installation.
Wireless LAN setup using “cableless setup” is now complete.
3. Install the Software (Mac OS X)
IMPORTANT
- Quit all applications before installation.
1. Visit http://canon.com/ijsetup/.
2. Select your region, printer name, and computer OS.
3. In the Product Setup section, click [ Download ]. The setup file will be downloaded.
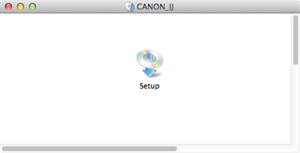
4. Double-click the downloaded .dmg file.
5. Double-click the [ Setup ] icon.
6. Click [ Next ].
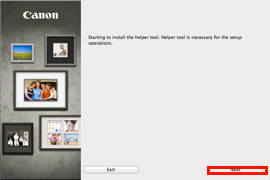
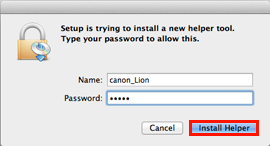
7. In the subsequent screen, enter the administrator name and password. Then click [ Install Helper ].
8. Click [ Next ].
9. Click [ Wireless LAN Connection ].

10. Click [ Connect via wireless router (recommended) ].
11. Click [ Next ].

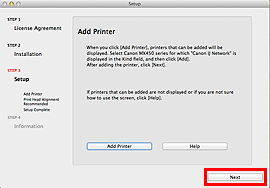
12. Click [ Cableless setup ].
13. Click [ Next ].
Follow any on-screen instructions to proceed with the software installation.
14. Click [ Add Printer ].
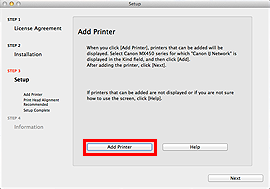
REFERENCE
- The alphanumeric characters after “Canon xxx series” is the machine’s Bonjour service name or MAC address.
- If the machine is not detected, make sure of the following.
– The machine is turned on.
– The firewall function of any security software is turned off.
– The computer is connected to the wireless router.
15. Select [ Canon xxx series Canon IJ Network ] and click [ Add ].
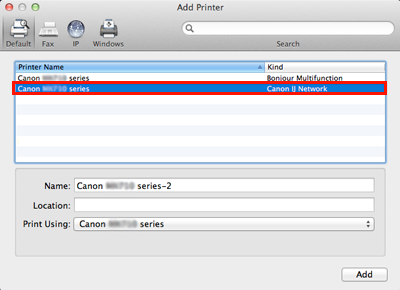
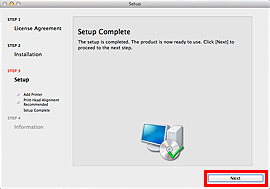
16. Click [ Next ].
17. Click [ Next ].
– Important Information for the installation
- If the Extended Survey Program screen appears
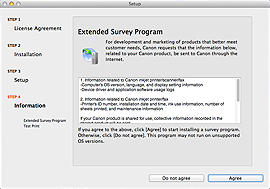
If you can agree to Extended Survey Program, click [ Agree ].
If you click [ Do not agree ], the Extended Survey Program will not be installed.
(This has no effect on the machine’s functionality.)
- When the Test Print window is displayed
Test printing will be performed to check the printer’s operation.
Load plain paper into the printer and click [ Execute ].
After test printing, click [ Next ].
To skip test printing, click [ Next ] instead of [ Execute ].
18. Click [ Exit ] to complete the installation.
Remove the Setup CD-ROM and keep it in a safe place.
Wireless LAN setup using “cableless setup” is now complete.
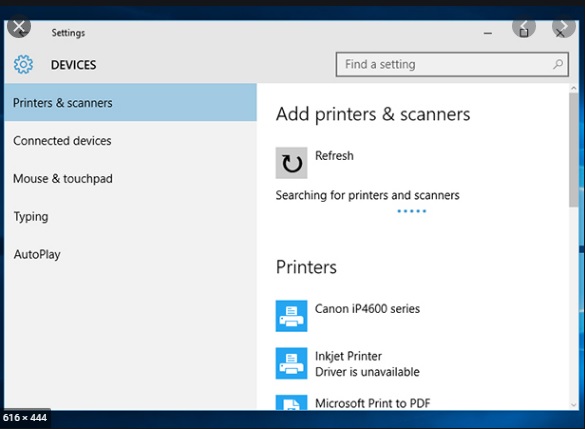
How to Download Driver for your printer through ij.start.cannon?
Now, once you have set up your Canon printer, the next turn is to download the driver for your printer. Here, are steps that you can follow to download the driver for your printer.
- At first, on your PC or laptop go to the ij.start.cannon.
- Here, you will see the Setup tab on the right side of the screen. Click on that.
- Now, a new page will open and it will ask you to enter your model number in the insert box or you can manually select the model by scrolling down.
- Then click on the start button and afterward, it will show you two options i.e. “First-time setup” or “Connecting to a Computer/Smartphone”.
- As you are going to set up the printer for the first time, click on the “First-time set up” option.
- It will show you some basics regarding the printer, then click 6 times on the next arrow to go directly to the download page.
- On the middle of the screen, you will see the “Download option box” in orange color. Click on that, and the download will start begins.
Now, you have successfully downloaded the driver file for your printer.
Setup IJ Start Canon Printer on Windows Via USB
Here is what you need to perform for making wired connection Setup IJ Start Canon Printer on Windows:
- First of all, you need to download the Canon printer driver & complete the installation process by following the on-screen prompts.
- Thereafter, connect your printer and Windows system via USB Cable.
- Open the “Control panel” from ‘Run’ dialog box from windows search option.

- Select “Devices and Printers” option.
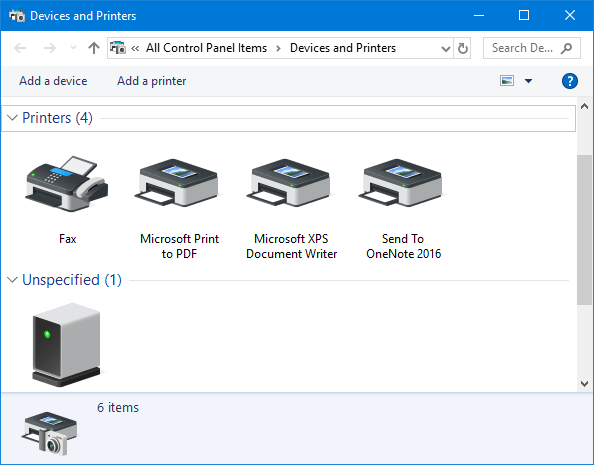
- In the next window you will see Green check-mark on your printer.

- If in case your printer is not listed over there, immediately click “Add printer” to add your printer manually. By doing this you will see all available printers are listed on the screen.
- Select your Canon printer from there.
- Click “Next” button and wait for a few minutes to let the printer be added to the list.
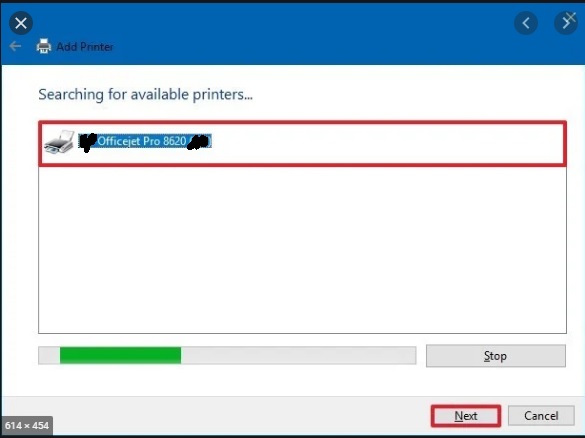
- Once it is successfully added, you will see a green check-mark on your specified printer icon.
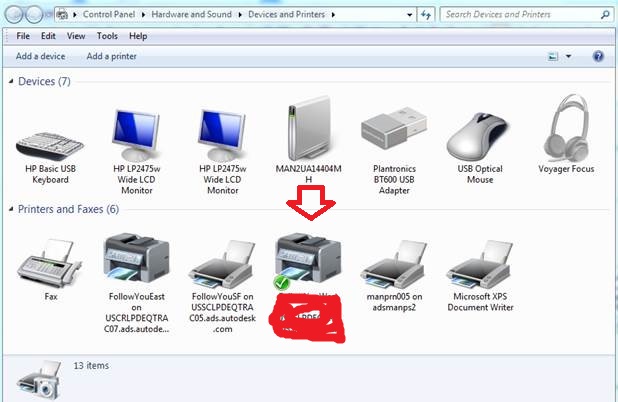
- At the end, your printer will be added to the printer list and now your printer is ready to deliver quality printouts from the connected system device.
Desired Procedure To Setup IJ Start Canon Printer on Mac
The beneath course of action will let you to effort freely complete IJ Start Canon Setup on MacOS. So, let’s follow them:
How to Connect the PC and Printer?
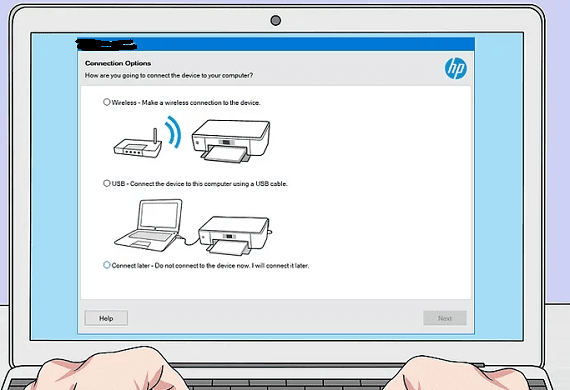
Once, you have downloaded the driver and the setup file, there are two ways to connect the PC with your printer. These two methods are as follows.
- Wireless Connection: To wirelessly connect your printer with the PC, on your printer screen go to the Wireless Settings and then Wireless LAN Setup Wizard, and at last, connect your printer to the same WIFI to which your PC is already connected. To check if it’s working, take out a sample printout.
- USB Connection: If your canon printer model doesn’t support the wireless connection, then you’re only left with the option of connecting your PC and the printer through the USB option. While you will be unboxing the printer, you will find the USB cable along with the other the components such as ink cartridges or tapes. Now, to connect the PC and the printer, fit one end of the USB cable in your PC and one end in the Printer.
How to Put papers in the Canon Printer?
After you have connected your PC and the printer, now it’s time to insert the pages into the Printer. Do this process very carefully, if the pages will not load correctly, then the printer will show various types of errors on the display screen. Here, are the steps through which you can put the papers in the ij.start.cannon printer.
- From the top of the printer, gently remove the tray cover.
- Then take out the paper support from the printer.
- Here, you see the paper feeder cover and remove it slowly.
- Now, take some A4 size sheets and make sure that the paper is not folded or cut from the edges.
- Then insert the pages in the printer facing downwards. Don’t cross the limit mark as the overfilling of the paper can cause paper stuck or jam issues.
- Align the lengths and dimensions of the papers in the same sequences and directions.
- At last, close the cover of the paper feed and slowly push the paper tray back into place.
Your print is now ready to use. You can now print or scan the documents.
Conclusion:
In this article, we have listed all the details and information regarding the ij.start.cannon printer. In case, if you have any specific queries, then feel free to connect with us through our social media pages. If you like the content, then please share this blog with your friends or family members who are going to buy the canon printers. This blog will help them from unboxing tips to taking out of final printout. For more information visit :-borntechy.com
Ij Start Canon Error List:
| Ij Start Canon Pixma TS3100 Series Printer Error Codes: | |
| Error Code | Solution |
| Canon Pixma TS3100 Error E02 | Printer is out of paper. Printing one side is complete if you are performing manual duplex printing. |
| E03 | The cover is open. Paper is jammed. |
| E04 | FINE cartridge is not installed properly. |
| E05 | FINE cartridge cannot be recognized. |
| E08 | Ink absorber is almost full. |
| E09 | Protective material or tape may still be attached to FINE cartridge holder. |
| E11 | Cannot perform printing with current print settings. |
| E12 | Specified data cannot be printed. |
| E13 | The ink may have run out. |
| E14 | FINE cartridge cannot be recognized. |
| E15 | FINE cartridge cannot be recognized. |
| E16 | The ink has run out. |
| E23 | IP address and subnet mask are conflicting. |
| E31 | Failed in wireless LAN setup. |
| E32 | Cannot find a wireless router during setup. |
| E33 | Cannot connect because multiple wireless routers are connecting to the printer. |
| E34 | Easy wireless connect has failed. |
| E36 | Easy wireless connect has failed. |
| E37 | Failed in wireless LAN setup. |
| E38 | Cannot connect to a wireless router. Cannot change the LAN settings. |
| E39 | Network error has occurred. |
| E45 | Cannot connect to network. |
| E46 | Cannot connect to network. |
| E47 | Cannot connect to server. |
| E48 | Cannot connect to server. |
| E49 | Failed in connecting to Internet because network connection is being prepared. |
| E50 | Failed in acquiring contents. |
| E51 | Cannot connect to server. |
| E52 | Failed in registering the printer to Google Cloud Print due to timeout. |
| E53 | Only information registered to the printer is deleted because of failing to connect Google Cloud Print. |
| E54 | Only information registered to the printer is deleted because of failing to connect IJ Cloud Printing Center. |
| E55 | The printer is already registered to IJ Cloud Printing Center. |
| E56 | The online service is not available in your region. |
| E57 | Scanning print head alignment sheet failed. |
| E58 | Trying to start copying before you register the paper size. |
| E59 | Paper settings for printing do not match paper information set on printer. |
| E61 | Scanning original has failed. |
| E62 | Unexpected error occurred while scanning is in progress. |
| E63 | Reached the upper limit of pages which can be saved. |
| E64 | Scanning original has failed. |
| E65 | Saving scanned data failed because the printer’s memory is full. |
| P02 | Printer error has occurred. |
| P07 | Printer error has occurred. |
| P10 | Printer error has occurred. |
- How to Scan: IJ Scan Utility Overview
- Using the printer’s display to print a disc label copy
- Using My Image Garden to print a disc label with a Mac OS
- Using My Image Garden to print a disc label with a Windows PC
- How to Scan: Loading Originals
- How to Scan: Operation Panel
- How to Scan: Scan to Windows® PC
- How to Scan: Scan to Mac
- How to Scan: Scanning a Document
- How to Scan: Scanning a Photo
- Troubleshooting
- Paper Jam: removing paper from inside the rear cover
- Paper Jam: removing paper from the rear tray
- Paper Jam: removing paper from the paper output slot
- Paper Jam: removing paper from inside the printer
- Wavy lines on the printed page
- Faint or missing Color on the printed page
- Wireless Setup
- Wi-Fi Connection with an Android device
- Wi-Fi Connection with iOS device
- Wi-Fi Connection with a Mac OS
- Wi-Fi Connection with a Windows PC
- Easy Wireless Connect with an Android Device
- Easy Wireless Connect with an iOS Device
- Easy Wireless Connect with a Mac
- Easy Wireless Connect with a Windows Computer
- WiFi Protected Setup with a Mac
- WiFi Protected Setup with a Windows Computer
- Manual Connect with a Mac
- Manual Connect with a Windows Computer
Frequently Asked Questions (FAQ’s)
- By mistake, I have made some changes in the printer settings and I’m not able to do it back. Can you help me by suggesting how can I reset my printer’s settings to their default?
A: Hey, don’t worry if you made the changes in your printer. You can easily reset your printer’s settings. To reset your printer’s settings search for the resume or cancel button on the top panel of the printer and hold it until the alarm will flicker 17 times. When the alarm stops ringing, release the button. After that, the printer’s settings will be restored to their original. Also, note that you again have to connect your printer to the WIFI.
- Where Can I search for all the products of the Canon?
A: In case, if you want to purchase canon products, you can visit their official website to get all the information about their products. Once you decide on the product which you wish to buy, then you can go to their “Where to Buy” page. There, you can enter your location where you live and the map will show you the location of their official stores near you, where you can go and buy their products. Although, their products are also available on online markets like Amazon and Flipkart.
- Do Canon also provides an extended warranty for their products?
A: Yes, canon provides an extra extended warranty on all of their products. To simply buy the extended warranty, you have to talk with the authorized dealer during the time of buying the product. He will add some minimal charges to your bill to extend the warranty period.
